Creating Cocozee
The first monster and the most important one to design was the nature monster that you would start and play the game as if you had picked it beforehand. The starting monsters have to be appealing in a cute way as they are meant to represent a younger maturity of their monster race but also appear to have potential as they will eventually grow.
Middle stages of maturing (also referred to as evolution in most games) have been cut entirely from this game for a few reasons. The first one is that they are simply unmemorable, a lot of the time they are awkward and forgotten due to them not going for cute or cool, more of a balance of both. But more importantly, maturing works a lot differently in this game due to a lack of any level system, rather you have to complete a certain task/s explained to you by a special NPC. I have also implemented narrative elements into this maturing system, having a thought out reason on how this strange method of progression makes sense.
Moving on from that design choice and back to the starting nature monster, I had a clear idea of what I wanted to create. My first idea was a coconut monkey, having both themes relating closely to tropical areas made sure that this monster would fit nicely into the environment. I tried to come up with some other ideas, some other tropical animals came to mind but for the most part I was already settled on the first idea I had come up with. When looking for references, I obviously chose to look at a lot of Pokemon monkeys and a few from other monster collection games as well, along with pictures of coconuts.
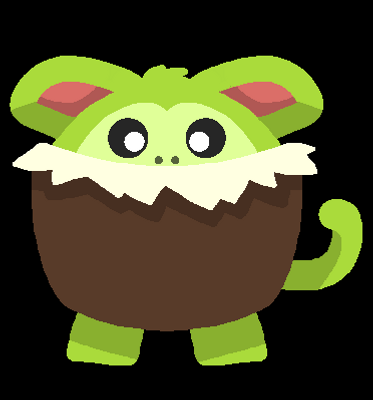
The finished design of character that I have named Cocozee features a lot of inspiration from the references above. I especially used the Pokemon Chimchar (reference #2) to understand what basic features a monkey themed monster should have as well as how to balance a starting monster design's cuteness as well as it's potential.
One problem I do see with the final design that I have made is that the frilly part of the coconut may look more like some form of facial hair to some people. Luckily this is only a problem with the concept art's perspective and a lack of 3D viewing and so this shouldn't be a problem in-game.
Creating Cocozee
The first monster and the most important one to design was the nature monster that you would start and play the game as if you had picked it beforehand. The starting monsters have to be appealing in a cute way as they are meant to represent a younger maturity of their monster race but also appear to have potential as they will eventually grow.
Middle stages of maturing (also referred to as evolution in most games) have been cut entirely from this game for a few reasons. The first one is that they are simply unmemorable, a lot of the time they are awkward and forgotten due to them not going for cute or cool, more of a balance of both. But more importantly, maturing works a lot differently in this game due to a lack of any level system, rather you have to complete a certain task/s explained to you by a special NPC. I have also implemented narrative elements into this maturing system, having a thought out reason on how this strange method of progression makes sense.
Moving on from that design choice and back to the starting nature monster, I had a clear idea of what I wanted to create. My first idea was a coconut monkey, having both themes relating closely to tropical areas made sure that this monster would fit nicely into the environment. I tried to come up with some other ideas, some other tropical animals came to mind but for the most part I was already settled on the first idea I had come up with. When looking for references, I obviously chose to look at a lot of Pokemon monkeys and a few from other monster collection games as well, along with pictures of coconuts.
The finished design of character that I have named Cocozee features a lot of inspiration from the references above. I especially used the Pokemon Chimchar (reference #2) to understand what basic features a monkey themed monster should have as well as how to balance a starting monster design's cuteness as well as it's potential.
One problem I do see with the final design that I have made is that the frilly part of the coconut may look more like some form of facial hair to some people. Luckily this is only a problem with the concept art's perspective and a lack of 3D viewing and so this shouldn't be a problem in-game.
Level Blockout

#1
#2
#3


#1
#2
#3
Compared to the planned layout, the blockout looks mostly the same, with less sharp corners for the star shaped layout and of course foliage such as tree and rock positions are planned out for when those assets are made. These positions may change if the current layout causes any problems for the assets.

Game Mechanics
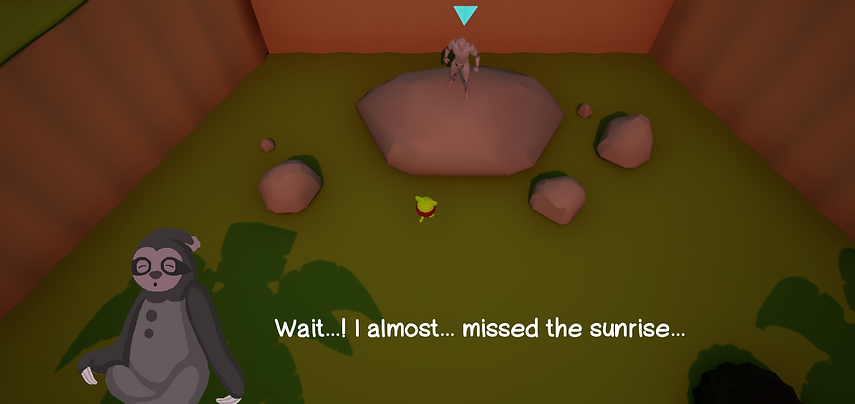
One of the only mechanics that is necessary for this tutorial section is of course the dialogue, both for grandma Brooke and the sloth (Pajamare). For this mechanic I used a helpful tutorial by Uisco on YouTube. This allows for a blue arrow to appear above NPCs when the player gets nearby to indicate that they can be interacted with and then through pressing E, dialogue will appear on screen, you continue pressing E until all lines of dialogue have been read.


The only other mechanic I needed was for the player to be able to make a sound, this would be used as the method to wake up the sloth (Pajamare). This was very simple and didn't require a tutorial to make, I found a temporary sound online and made sure that the letter F would both make a sound and trigger dialogue with Pajamare when nearby.
Modelling Cocozee
The first model I needed to make was the player model. This is mostly because... this blockout isn't the most flattering depiction of Cocozee.

For this model I will need to learn how to use a couple new techniques in Maya for certain parts such as mirroring ears and legs as well as how to create cables so that I can give Cocozee a tail.
I also need to make sure that the coconut is accurate to my concept art, having a frilly part around the edge of the coconut. I haven't made a character model before yet, however this character's design is purposefully simple enough for me to not have too hard of a time making.
I first started with the coconut body as it's what takes up most of Cocozee's design. I started with a sphere that I lowered the height of slightly since coconuts aren't perfectly round, I removed a lot of faces on the top layers of the sphere since the coconut is obviously hollowed out for Cocozee to fit inside.
To create the frilly part I simply extruded the edges then adjusted them to look natural by selecting every other vertex point and positioned them to create a frill. From there I manually adjusted every point in order to create a messier and more natural frill.

For the head I simply created a smaller sphere and so I started on the ears. This was probably the most challenging part of this model but I had an idea of what I could do to create good looking ears. I started with a cylinder and shaped it roughly into an ear shape I wanted, from there I used edge loop to decide how wide the rim of the ear will be and then extruded the rim faces. Finally, I selected all the edges I wanted to bevel and finished the ear.
I was unsure on how to mirror models perfectly and so I checked online and found a really easy technique. I simply had to duplicate the ear then set the X scale of the duplicate ear to -1, this resulted in the shape mirroring the other shape perfectly. Through this ear I've learnt a lot that should help in future when creating more complex character models.


The next part to create were Cocozee's legs, for this I just needed to shape a cylinder into some sort of stumpy leg and add a bevel to make sure that they don't look too sharp.
I used the same mirror technique that I used for the ears to perfectly mirror this leg onto the other side. With this, Cocozee's model was almost finished with only a tail left to make.

The tail required me to learn how to make cable shapes in Maya I watched a quick cable tutorial by askNK on YouTube and through using the EP curve tool and sweep mesh I easily created a tail for Cocozee.


I am happy with the final model for Cocozee, I think I made some good changes to it compared to the concept art. I made the legs wider and bigger which looks a bit more proportionately correct as well as made the coconut more round and less boxy as it also looked a bit strange. One thing I did miss out was the tuft of hair on the head simply because I wasn't quite sure how to make it and so that's one thing that could be improved on with the model.
.png)

Rock Assets
These are the easiest assets to make, I made three versions in total that I'll also resize into three different sizes within Unreal, allowing for nine variants of rocks. For these rocks I just created spheres and manually adjusted the vertices to create natural shapes, then I added a bevel of one to the rocks to finish them off.


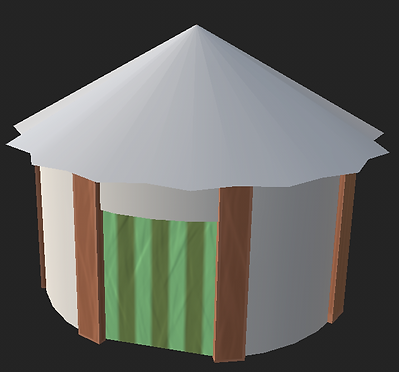
Brooke's House Model
The only structure and the most distinct feature of the level is grandma Brooke's house in the centre of the level. Because of this I chose to make that the next asset that I'd make.
I started with two wide cylinders, one being the main body of the house and the other being repurposed into a cone to create a hut roof. For the roof I adjusted every other vertex point to create a rough edge as it's supposed to be made of some sort of hay. For the body of the house I copy and pasted poles, making use of point snap to make sure they were evenly spaced around the house.

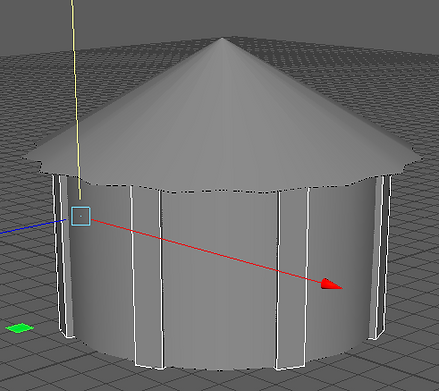
For the door I simply removed some faces on one of the sides and added a couple shapes that will act as a sheet door.
I could have probably added some windows but due to the top down perspective I didn't see it as too necessary but maybe on a more finished level I would anyway.
I think the final asset for this house will most likely be the first model I try and texture as it's the most important to properly texture and would be the best model how to learn how to texture assets with.

Misc Assets
A couple assets were just necessary ones that could be made very quickly such as Brooke's coconut bowl and the tree stump that Brooke sits on and is also found in the deforested sections of the level.
For the coconut bowl I mostly only really had to copy and paste the coconut part of Cocozee's body.
I extruded the edges inside the coconut to make a proper hollow inside. Then I added a very wide sphere inside of the hollow coconut.
To create the bumpy texture on this sphere to suggest that a meal is being cooked inside of the bowl was just done by adjusting the position all of the vertex points and then adding a bevel of one at the end to smooth it out. This meal is some sort of coconut pudding.

Tree and Bush Assets
I had made rocks but to finish the foliage I still needed to create tree and bush assets. For the tree I also needed stump and log versions for the deforested sections of the level for some visual narrative.
Looking at some stylized palm trees for reference, I tried making the log of the tree have layered sections that give it a palm tree appearance. This was done through scaling some of the edges and raising them up.
Once the log was done I rotated it and exported a log version of the palm tree, then used the same model to edit and create a stump version which I also exported. The next part I had to make were the leaves. Through a cube with many subdivisions, I used the scaling tool to shape the leaf into a feather-like shape, then I adjusted vertices to finish the palm leaf appearance.

When applying the leaves to the tree I wanted to make sure there was some variation and so some were flipped and bent into different positions.
I bent the leaf downwards and duplicated the leaf multiple times so that I can manually position around ten leaves atop the tree. Originally before starting this asset I was worried that I wouldn't be able to figure out a way to create the palm leaves but after coming up with this method I now have more confidence in making large leaves and will be able to create even better looking ones in the future.


For the bush I started with a semi-sphere, then added a simple ruffle shape by extruding layers of the sphere then lowering every other vertex point on each layer. Originally I was going to stop there but I wasn't happy with how it looked yet, so I selected every other row of vertex points and scaled them down to give the bush a spiky outline. Similarly to the leaf, I was worried that I would struggle with this asset but now that I have at least one method of creating bushes I should be more confident with it in the future.


Terrain Walls
The only modular asset that is necessary for this level is the terrain walls that surround the level. I mostly tried to take inspiration from Animal Crossing: New Horizons because it has similarly stylized environments. For the wall I first extruded parts so that the wall would have a consistently bumpy texture.


Next, I duplicated the wall and lowered it's height by a lot so that it can act as the thin layer of grass on top of the ground. To finish the grass I beveled it and had finished the modular terrain.
For this specific level I can get away with just a single asset for terrain but in future levels I may need a lot more modular shapes to fit level layouts effectively. This is another asset that I'd prioritize if I get the chance to do any texturing on these models.
Adding to Unreal
With most of the assets made, I now can start importing them into Unreal. I replaced all of the blockout props with proper assets as well as the modular terrain walls. The rocks were given nine total variants that I spread across the map as well as some bushes. The final thing I did was create some nice lighting that should hopefully give the feeling of the sun rising as this level is set early in the morning and is even mentioned by the Pajamare NPC.
Some things which are still missing are obviously the other character models. After attempting one of them I realized that humanoid character models are quite difficult and so for now I'll be working on other things such as finishing the foliage and including less important aspects of the level such as the character selection screen.

Adding Grass and Flowers
Originally I was going to stop at bushes and trees but the ground was still feeling very flat and I wanted some moving foliage (from wind). For this I used a helpful tutorial by Marpetak Dev on YouTube.


Obviously a model had to be made first and so I made my own grass asset similar to the one featured in the tutorial. Once it was imported into Unreal I wasn't quite sure how to remove collision on the asset but through a quick search I learned that collision can be removed through just clicking "remove collision" while editing the asset in Unreal.
With that, the model itself was finished but the grass still wasn't animated and so through the tutorial I learnt that you can create windy effects on materials through adding a "SimpleGrassWind" blueprint.
Once the blueprint is was finished I was able to edit the wind intensity, weight and speed. Once I had adjusted those values to how I liked it I also did the same for my bushes and leaves, but slightly more subtly animated to help keep the rest of the foliage consistent with the grass.


For this asset I created a simplified stem that bends forwards and flower shape with five large petals, just like the real flower.
For the middle part I used offset edge loop to create faces in the centre that I could extrude into a similar shape. In order to not overdetail the flower, I left out the pollenated part at the end of the middle extrusion and just had it end at a point.
Once I exported the flowers into Unreal, I duplicated groups of three flowers around the scene since images show that these multi-colour flowers are usually in groups rather than alone.


In order to give the scene some variety in colour, I thought tropical flowers would be a good idea. For this asset I wanted to replicate a real life tropical flower and so through some searching I found a vibrant one called a hibiscus flower. Two key features to replicate in a stylized and simplified version of this flower are that it has five petals and the middle part that sticks far outwards for easier pollination.
Making a Selection Screen
To do this I used a main menu tutorial by BeardGames on YouTube. The main menu first has to be made in a separate level and then through the widget editor I created a working play button, exactly the same as the tutorial. This button would be the "select Cocozee" button and the other character selection buttons would do nothing as their starting areas obviously aren't made.
For the characters which haven't been made yet, I just put question marks for their images. The final menu is pretty similar to the concept one I created a while back, with necessary additions such as a prompt and selection buttons.


Narrative Elements
Something that the level is currently lacking is more narrative elements and so I want to add a pop up of text of the character's thoughts when they go near deforested sections of the area. Luckily I know how to make a widget appear on the screen using a box collision thanks to the "Press 'E' to interact" prompt I made in Unit 07.
I made it so that the text "This area has been deforested by those creatures..." will appear on screen whenever the player is inside a box collision that surrounds palm logs.

Adding UI
So far there's no indication for which monster you are and what button to press to use your character's ability (for Cocozee it's making a sound). I'm putting these UI elements at the top of the screen to make sure it doesn't get in the way of any text or dialogue.
For the ability I just added an icon that clearly shows sound and the key that must be used to press it. For which character you are I made sure to add two extra empty circles, this is because you will be able to instantly switch between any three characters you have unlocked and equipped, only being able to change the loadout with a certain area/NPC.

Texturing Brooke's House
Although I wouldn't have enough time to texture everything that I'd want to, I did want to try to at least texture Brooke's house. For this I wanted to replicate the reference that I used for the house's shape

I wanted to replicate this stylized texturing style, specifically on the wood. I also wanted to figure out how to create a stripy pattern for the fabric door. When creating the wood texture I would have liked to create those sort of lines that the inspired image uses but it requires some form of drawing on the textures yourself and so that's something I'll try in the future.
Instead of replicating the reference's wood, I used a UV border distance smart mask to create a lighter border on the edges of the wooden parts to give it a stylized appearance, as well as using similar browns to the inspired image. Subtle crease textures were used to finish off the wood-like appearance.
For the fabric door I wanted to use greens instead of blue and white due to Brooke's love of nature and so I used a stripy texture that needed to be adjusted and rotated in a vertical pattern, as well as reusing the same crease textures used on the wood to create a fabric appearance while still having a stylized feel.
I didn't get to finish this texture before running out of time and so unfortunately I didn't use it in the final level but it still helped me learn more about texturing.